是什么
TextEditingController是 Flutter 提供的一个 控制器类,用来管理 TextField / TextFormField 的输入内容。作用类似于 MVC/MVVM 里的 数据模型,能让你随时读写输入框的值、监听输入变化。
核心属性和方法:
text:当前输入框的文本。selection:光标位置。addListener():监听内容变化。dispose():释放资源(StatefulWidget 必须在dispose()里销毁)。
有什么作用
获取和设置输入内容
final controller = TextEditingController();

// 设置初始值
controller.text = "默认用户名";

// 随时读取
print(controller.text);
监听输入变化:只要输入框发生变化都会执行监听器定义的方法
controller.addListener(() {
  print("输入框内容变化: ${controller.text}");
});
控制光标/选中范围
controller.selection = TextSelection(
  baseOffset: 0,
  extentOffset: controller.text.length,
);
适用场景
需要实时获取输入内容(例如:搜索框,边输边查)
需要动态修改输入内容(例如:输入后自动格式化手机号)
需要操作光标或选择文本(例如:富文本编辑器、代码编辑器)
表单外部也要随时访问输入框内容(而不仅仅是提交时)
案例:监听器
import 'package:flutter/material.dart';
void main() {
runApp(const MyApp());
}
class MyApp extends StatelessWidget {
const MyApp({super.key});
@override
Widget build(BuildContext context) {
return MaterialApp(
home: Scaffold(
appBar: AppBar(title: const Text("TextEditingController 示例")),
body: const Padding(
padding: EdgeInsets.all(16.0),
child: RegisterForm(),
),
),
);
}
}
class RegisterForm extends StatefulWidget {
const RegisterForm({super.key});
@override
State<RegisterForm> createState() => _RegisterFormState();
}
class _RegisterFormState extends State<RegisterForm> {
final _formKey = GlobalKey<FormState>();
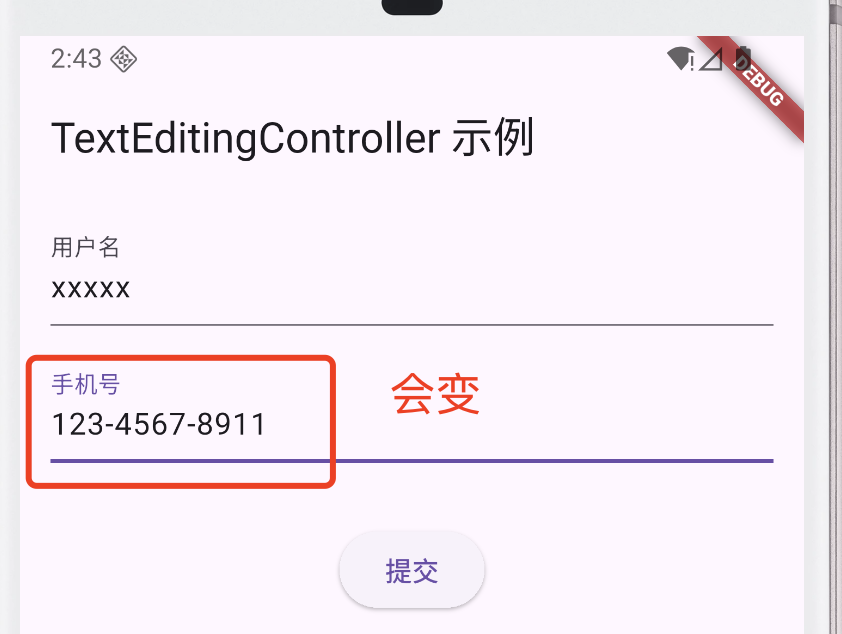
final _phoneController = TextEditingController(); // 必须用
String? _username;
@override
void initState() {
super.initState();
// 监听手机号输入,做自动格式化
_phoneController.addListener(() {
debugPrint("手机号输入: ${_phoneController.text}");
// 替换电话号码中的 "-"
final text = _phoneController.text.replaceAll("-", "");
if (text.length >= 11) {
final newText =
"${text.substring(0, 3)}-${text.substring(3, 7)}-${text.substring(7, 11)}";
debugPrint("格式化后的手机号: $newText");
if (newText != _phoneController.text) {
_phoneController.text = newText;
_phoneController.selection = TextSelection.fromPosition(
TextPosition(offset: _phoneController.text.length),
);
}
}
});
}
@override
void dispose() {
_phoneController.dispose(); // 释放资源
super.dispose();
}
void _submit() {
if (_formKey.currentState!.validate()) {
_formKey.currentState!.save();
print("用户名: $_username");
print("手机号: ${_phoneController.text}");
ScaffoldMessenger.of(
context,
).showSnackBar(const SnackBar(content: Text("提交成功!")));
}
}
@override
Widget build(BuildContext context) {
return Form(
key: _formKey,
child: Column(
children: [
// 用户名:不需要 controller
TextFormField(
decoration: const InputDecoration(labelText: "用户名"),
validator: (value) =>
(value == null || value.isEmpty) ? "请输入用户名" : null,
onSaved: (value) => _username = value,
),
const SizedBox(height: 16),
// 手机号:必须用 controller
TextFormField(
controller: _phoneController,
decoration: const InputDecoration(labelText: "手机号"),
keyboardType: TextInputType.phone,
validator: (value) =>
(value == null || value.isEmpty) ? "请输入手机号" : null,
),
const SizedBox(height: 32),
ElevatedButton(onPressed: _submit, child: const Text("提交")),
],
),
);
}
}
设置光标位置
在上面有这么一段代码:
_phoneController.selection = TextSelection.fromPosition(
  TextPosition(offset: _phoneController.text.length),
);
TextEditingController.selectionselection表示输入框中 光标的位置 或 选中的文本范围。- 它的类型是
TextSelection。
TextSelection.fromPosition- 这是一个构造函数,用来快速创建“光标在某个位置”的
TextSelection。 - 参数是
TextPosition(offset: n),表示光标在第n个字符之后。
- 这是一个构造函数,用来快速创建“光标在某个位置”的
TextPosition(offset: _phoneController.text.length)- 这里
offset = _phoneController.text.length,意思是把光标放在 文本的最后。 - 举个例子:如果输入框内容是
"123-4567-8911",长度是 13。那么offset = 13,光标就会跳到最末尾。
- 这里
- 为什么要这么写:
- 因为在手机号格式化逻辑里,你会重新赋值
controller.text = newText。 - 每次赋值都会导致光标重置到开头(Flutter 的默认行为)。
- 所以必须手动再设置一次光标,否则用户体验很差(每次输入完都会跑到最前面)。
- 因为在手机号格式化逻辑里,你会重新赋值
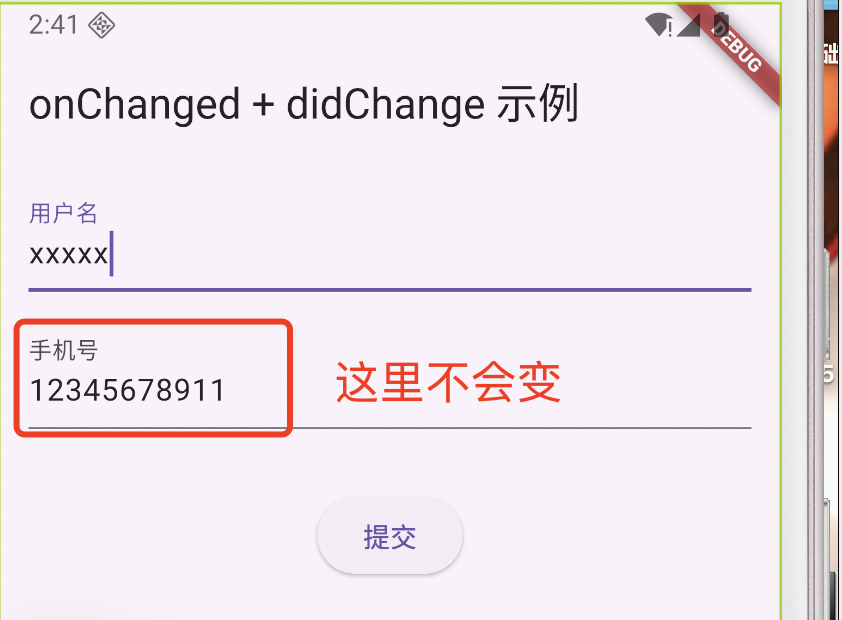
案例:onChanged + state.didChange
import 'package:flutter/material.dart';

void main() {
  runApp(const MyApp());
}

class MyApp extends StatelessWidget {
  const MyApp({super.key});

  @override
  Widget build(BuildContext context) {
    return MaterialApp(
      home: Scaffold(
        appBar: AppBar(title: const Text("onChanged + didChange 示例")),
        body: const Padding(
          padding: EdgeInsets.all(16.0),
          child: RegisterForm(),
        ),
      ),
    );
  }
}

class RegisterForm extends StatefulWidget {
  const RegisterForm({super.key});

  @override
  State<RegisterForm> createState() => _RegisterFormState();
}

class _RegisterFormState extends State<RegisterForm> {
  final _formKey = GlobalKey<FormState>();

  String? _username;
  String? _phone;

  void _submit() {
    if (_formKey.currentState!.validate()) {
      _formKey.currentState!.save();
      print("用户名: $_username");
      print("手机号: $_phone");
      ScaffoldMessenger.of(
        context,
      ).showSnackBar(const SnackBar(content: Text("提交成功!")));
    }
  }

  @override
  Widget build(BuildContext context) {
    return Form(
      key: _formKey,
      child: Column(
        children: [
          // 用户名:不用 controller
          TextFormField(
            decoration: const InputDecoration(labelText: "用户名"),
            validator: (value) =>
                (value == null || value.isEmpty) ? "请输入用户名" : null,
            onSaved: (value) => _username = value,
          ),
          const SizedBox(height: 16),

          // 手机号:用 onChanged + didChange
          FormField<String>(
            validator: (value) =>
                (value == null || value.isEmpty) ? "请输入手机号" : null,
            onSaved: (value) => _phone = value,
            builder: (state) {
              return TextField(
                decoration: InputDecoration(
                  labelText: "手机号",
                  errorText: state.errorText,
                ),
                keyboardType: TextInputType.phone,
                onChanged: (raw) {
                  // 去掉非数字
                  debugPrint("手机号输入: $raw");
                  final digits = raw.replaceAll("-", "");
                  // 格式化
                  String formatted = digits;
                  if (digits.length >= 11) {
                    formatted =
                        "${digits.substring(0, 3)}-${digits.substring(3, 7)}-${digits.substring(7, 11)}";
                  }
                  debugPrint("格式化后的手机号: $formatted");
                  // 通知 FormField 更新值
                  state.didChange(formatted);
                },
              );
            },
          ),

          const SizedBox(height: 32),
          ElevatedButton(onPressed: _submit, child: const Text("提交")),
        ],
      ),
    );
  }
}
两种方案的区别
onChanged + didChange 数据流:
用户输入
   │
   ▼
TextField (onChanged)
   │
   ▼
FormFieldState.didChange(value)
   │
   ▼
更新 FormFieldState.value
   │
   ▼
FormFieldState.setState()
   │
   ▼
重新 build builder
   │
   ▼
UI rebuild (但 TextField 本身的文字不会变)
这种方式只更新 FormFieldState.value,不会自动改变输入框显示的内容。所以如果你做了格式化,用户看到的还是原始输入。
输入
12345678911,onChanged会拿到这个原始字符串。可以在里面调用
state.didChange("123-4567-8911"),这样FormFieldState.value里保存的就是格式化后的值。但是!
TextField本身的显示内容还是用户刚输入的12345678911,不会自动变成123-4567-8911。
因为didChange只更新 Form 的内部状态,不会把值写回输入框。
TextEditingController 数据流
用户输入
   │
   ▼
TextField 绑定 controller
   │
   ▼
TextEditingController.text 改变
   │
   ├──> addListener() 回调(可触发逻辑,如格式化)
   │
   └──> Flutter 框架自动刷新输入框显示
           │
           ▼
        UI 和数据保持一致
这种方式直接绑定 TextEditingController,所以输入框的显示和底层数据始终同步。适合做格式化、光标控制、自动填充等场景。
用户输入
12345678911→controller.text变了。在
addListener里,你格式化并回写controller.text = "123-4567-8911"。这时候 Flutter 框架会立刻刷新输入框内容,页面显示就会变成
123-4567-8911。

